
The FlowTraq upgrade process must achieve the goal of upgrading each of the major components (the FlowTraq server and the Web interface files). In a cluster, all FlowTraq servers must be upgraded. In general, to ensure correct operation the FlowTraq server is upgraded first (wherever needed), followed by the Web interface.
![[Note]](../common/images/admon/note.png) | Note |
|---|---|
During the upgrade process, portions of the FlowTraq service will be unavailable. In particular, any FlowTraq server directly receiving flow data will be unable to receive and process those flows during the brief time in which the service is being shut down and replaced. Typically, this process is only a few minutes, but should be timed in order to minimize the impact of the outage. When upgrading a cluster, individual workers should be upgraded separately rather than all at once. This allows the FlowTraq portal to load-balance around them. While workers are offline, queries will return slowly and with potentially incomplete data. It is strongly recommended to notify all end users before upgrading for this reason. |
Upgrading from FlowTraq Q2/15 or earlier to a later version of FlowTraq (Q3/15 or later) involves a one-time set of extra steps that were previously unnecessary. To improve performance, featureset, and flexibility of the FlowTraq system the anomaly detection system (commonly known as 'NBI') is now a built-in part of the Flowtraq portal daemon. In previous versions of FlowTraq this was a separate component that required separate installation, as well as relying on a PostgreSQL database. Both the postgres database and the flowtraq-nbi components are no longer necessary.
Upgrading to Q3/15 from a previous version of FlowTraq therefore involves disabling and un-installing the old flowtraq-nbi component, as well as disabling or uninstalling the postgres database. If you have anomaly detectors configured in the legacy NBI system then please refer to the section below. Manual migration is encouraged, and the FlowTraq support team is available to assist you. If you never installed the flowtraq-nbi component, then the steps below are unnecessary.
| Note |
|---|---|
If you are using legacy flowtraq-nbi detectors make note of their configuration in the detector configuration panel. This panel will no longer be available after upgrade. The section below on detector migration outlines how to achieve equivalent functionality with FlowTraq Q3/15. |
Not all users need to complete all steps. The needed steps are determined by whether NBI was previously installed, and the degree to which it was used. The graphic below will help determine whether any special steps are required, and the easiest upgrade path.

| Note |
|---|---|
To determine whether you are running the FlowTraq Virtual Appliance, log into the host running FlowTraq. On most installs, the blue menu screen will appear on login. If it does not, check for an executable script named flowtraq_setup.sh and run it; if in either case the blue menu screen appears, you are running the FlowTraq Virtual Appliance for the purposes of the upgrade. 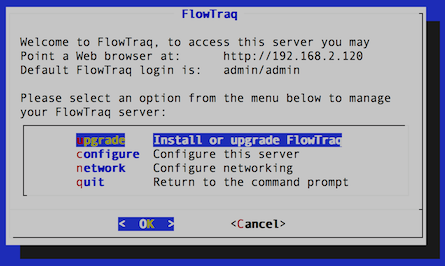 |
| Note |
|---|---|
To determine whether you are running FlowTraq NBI, log into the host on which FlowTraq Web is installed (always a Linux or BSD host) and look for the directory /opt/flowtraq-nbi/. If that directory is present, then NBI is installed. To determine whether any Detectors are configured, log into the FlowTraq user interface and open "Detectors" in the left-hand navigation bar (under "Threats"). If any items appear in the table, as below, then Detectors are configured. 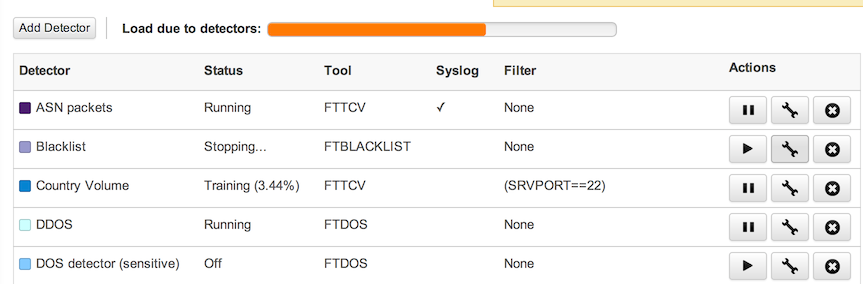 |
Use the flow chart above to determine the path needed. Where told to “upgrade normally”, proceed to the next full section, which includes upgrade instructions for the virtual appliance and other deployments. If a particular upgrade path is indicated, they are found below.
When the upgrade is finished, you can confirm that the upgrade has completed successfully, and that the original NBI process is no longer running with two steps. First, navigate to the Cluster page in the FlowTraq UI and verify that you are running FlowTraq Q3/15 or later. Second, log into the host that was running NBI, and search for the flowtraq-nbi process in the current active process list:
ps -ef | grep flowtraq-nbi
If NBI is no longer running, the result will look similar to this:
root 11728 10367 0 12:25 pts/0 00:00:00 grep flowtraq-nbi
If either test does not indicate success, or if there is uncertainty, please contact FlowTraq support at support@flowtraq.com
There is only one additional task in this scenario, and it is optional: determine what detectors have been configuring under the older NBI system, and migrate them to the new detection system. This includes tasks both before and after upgrading to Q3, and the full process is described in the section named “Migrating Detectors” below.
Otherwise, upgrade the virtual appliance normally using the virtual appliance Update menu item, following all instructions presented.
Once the upgrade and migration are completed, delete the 'nbiadmin' user (if present). Log into FlowTraq user interface as an administrative user. Navigate to the Administration->Partitions and Users page. In the main partition you will find the original flowtraq-nbi credentials: "nbiadmin". Click on the nbiadmin user and select "Delete User".
This path, like path 3, requires manual removal of the FlowTraq NBI component. This ensures that this component’s UI elements do not clutter the FlowTraq interface, and that it does not consume resources on the host.
| Note |
|---|---|
The original NBI components can be removed at any time, not just at upgrade. If the detector migration is likely to be time-consuming, or assistance will be required, it is safe to upgrade normally without first removing NBI. |
Disable and uninstall flowtraq-nbi: log into your FlowTraq portal host as root or with sudo privileges. Run:
/opt/flowtraq-nbi/uninstall.sh
After the uninstall finishes, it is safe to completely delete the /opt/flowtraq-nbi directory, which is no longer needed:
rm -rf /opt/flowtraq-nbi
Disable the postgres database access and remove the old UI elements: on the FlowTraq portal host, edit file /var/www/flowtraq/config.php (sometimes found under /var/www/html/flowtraq/config.php, or /srv/www/html/flowtraq/config.php). Remove the following two lines:
define("SHOW_MITIGATIONS", true);define("NBISERVER", "host=127.0.0.1 port=5432 dbname=flowtraq user=flowtraq password='XXXXXX'");Save the file. No need to restart the apache web server until the new web components have been installed.
(Optional) Uninstall the postgres database: this step is not necessary. Depending on your operating system you may need to invoke your package manager to remove the database software. To delete any existing flowtraq-nbi databases, issue the following two commands as root (including the brackets):
(su -c "echo DROP DATABASE FLOWTRAQ | psql -U postgres" postgres)
(su -c "echo DROP ROLE FLOWTRAQ | psql -U postgres" postgres)
Install the Q3/15 FlowTraq daemon normally. Download the daemon installer, and run the installer:
wget http://www.flowtraq.com/downloads/flowtraq/flowtraq_Q3_15u1-16810/FlowTraq-Q3_15u1-server-unix.sh.gz
gunzip FlowTraq-Q3_15u1-server-unix.sh.gz
sh ./FlowTraq-Q3_15u1-server-unix.sh
Download and unpack the Q3/15 web user interface. In the root of your web server (either /var/www, /var/www/html, or /srv/www/html):
wget http://www.flowtraq.com/downloads/flowtraq/flowtraq_Q3_15u1-16810/FlowTraq-Q3_15u1-web.tar.gz
gunzip -c FlowTraq-Q3_15u1-web.tar.gz | tar xvf -
The updated web interface may require your apache system to consume more memory than before. To avoid the out-of-memory condition, make the following change to: /etc/php5/apache2/php.ini
Find the line that specifies: memory_limit = XXXM And make sure it is set to (at minimum):
memory_limit = 2048M
Note This change allows PHP threads to consume more memory when needed, but only when needed. During most operations, the threads will be well below this limit.
Now restart your apache server:
/etc/init.d/apache2 restart
Or:
service apache2 restart
Delete the 'nbiadmin' user: log into flowtraq user interface as an adminsitrative user. Navigate to the Administration->Partitions and Users page. In the main partition you will find the original flowtraq-nbi credentials: "nbiadmin". Click on the nbiadmin user and select "Delete User".
The upgrade is complete after the last step.
The only difference between path 3 and path 2 is the optional migration of detectors. Consult the section “Migrating Detectors” below, and then proceed with the instructions in Path 2.
With the introduction of Q3/15 the role of traffic groups has become central to detection. Traffic groups define for FlowTraq the details of your network, including all internal and external space to monitor for trouble conditions. Detection policies are therefore defined on traffic groups, which are shared with the quickviews and filtering components of FlowTraq. A traffic group can contain many CIDR blocks, or simply an individual IP address, depending on detection requirements.
In the legacy flowtraq-nbi system detectors required a custom filter to focus on particular traffic; this functionality is now provided through the traffic groups interface.
In order to achieve improvements to speed, accuracy, and clarity of FlowTraq’s alerts, a number of basic changes have been made to how FlowTraq detects trouble conditions, and so a one-time migration process is necessary. The aim of this process is to recreate detection policies in the upgraded system that reproduce the functionality of the old detectors. There is not always a one-to-one correspondence between the older detectors and new methods; guidelines are given below for creating new detectors.
Before migrating detectors, it is advisable to setup traffic groups for all blocks of addresses that previously had detectors defined. As soon as a traffic groups is defined, its traffic can be quickly analyzed in the new "quickview" feature of FlowTraq.
Navigate to the Detector page in your Q2/15 or earlier FlowTraq install (under “Threats”), and make note of the detectors still in use. This is an opportune time to trim older, unused, or unwanted detectors (such as those that have been turned off).
Make a note of any port filters in place for each detector, and whether specific traffic groups, IPs or CIDRs on your network are filtered on. For blacklist detectors, make sure you have a copy of the most recent version of the blacklisted addresses in a local file.
Once these notes have been made, proceed with upgrading the FlowTraq server and removing the old NBI system as described in the appropriate path above.
Navigate to the "Detection->Policies" page to setup your alerting policy. Further detail on the Policy page is available in the Operation chapter of this manual, under “Policies and Alerting”. For each of the detectors to migrate, consult the list below for the original type and advice on creation of new detectors.
- Blacklists
Instead of configuring blacklists on a per-detector basis, FlowTraq now offers the ability to upload one or more blacklists through the "Administration->Blacklists" panel. After uploading a blacklist, navigate to the "Detection->Policies" panel to define alerting policy for your traffic groups. Although this involves an additional step of defining alerting policy, it allows for multiple traffic groups to make use of the same blacklists.
- Data Exfiltration
In the policies panel, define the trigger point for data leaving the traffic group. Only systems that send data to a host that is not defined as "internal" to the partition will cause a data exfiltration alert. The trigger is total number of bytes sent.
- Behavioral Fingerprint Generator / New Client / New Server
The behavioral fingerprint detector alerts when new client->service pairs are discovered on your network. This detector has been replaced with a two different policies, one for new server IP/ports apearing in the traffic group, and second policy when a new client IP is detected for a known server IP/port in your traffic group. Only confirmed two-way communications are alerted on.
- Thresholds
Thresholds can be defined for either traffic groups, or exporter/interfaces. The trigger point is defined as a rate, either packets per second in/out, bits per second in/out, or new connections per second. It is also possible to define the trigger point as a percentage of learned baseline. Baselines are learned and refined as traffic crosses your traffic groups or interfaces. FlowTraq uses a sophisticated baselining technology that remembers natural variations during different times of the day, and different times of the week.
Note Rate thresholds in Q3/15 are based on traffic groups rather than individual IP addresses, in order to clarify functionality and improve detection speed. To alert on session volume from individual hosts, use Data Exfiltration detectors.
Where rate detection for individual sensitive hosts is required (e.g. for a main web server or VIP), it is possible to create traffic groups consisting of a single IP address.
- Port/Protocol Thresholds
Similar to traffic group and exporter/interface thresholds, rate-based trigger points can be defined by any port/protocol combination, for any specific traffic group. For instance, if the new SSH TCP/22 connections exceed 10 new connections per second. It is also possible to define multiple policies for different rates, each with a higher alerting severity.
- Denial of Service (DoS/DDoS) Detection
FlowTraq Q3/15 offers a much wider range of sophisticated DDoS detection than previous versions of FlowTraq. Two major categories are packet floods, and amplification attacks, and trigger points can be set on a per-traffic group basis. It is further possible to set lower trigger points for specific classes of attack, such as SYNFlood, SMURF, DNS reflection, or LAND attack, etc.
- Scan Detection
Port and host scans are detected terms of unique endpoint connections made per second. Typical communication patterns rarely show more than a couple connections per second to local endpoints or remote blocks. Set a trigger point of 10 unique endpoints per second for detection of scans and worms.
The FlowTraq virtual appliance update routine is simple, and performs the recommended steps of a web portal upgrade automatically. Log into the virtual appliance console, and select upgrade from the main menu.
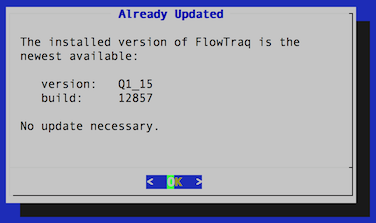
The upgrade routine will contact FlowTraq to determine the most recent release and download that release. If there is no new version available, the routine will display the current server version and then bring the user back to the main menu.
If a new version of FlowTraq is available, or a new build of the current release, selecting 'update' will trigger the upgrade routine. This will upgrade the FlowTraq server and FlowTraq Web, as well as download security updates to selected packages. This process should take less than five minutes on a typical Internet connection.
| Note |
|---|---|
When upgrading using the virtual appliance, it may be necessary to install the common CA certificates so that your system recognizes FlowTraq's credentials. If the update fails with an SSL warning, exit to the command line, enter the following command: apt-get install ca-certificates Then open flowtraq_setup.sh and try the upgrade again. |
To upgrade the Windows version of FlowTraq server, download the most recent install package and run it with executable permissions. The current configuration is retained and the new server daemon is started right away.
| Note |
|---|---|
In some circumstances, the Windows install routine may raise a notification that a reboot is required to finish installation. This is rarely the case. Log into FlowTraq and verify that the new version of the server is installed and running. Only if the version number has not updated is a reboot actually necessary. |
To upgrade the Mac OS version of FlowTraq server, download the most recent install package and run it with executable permissions. The current configuration is retained and the new server daemon is started right away.
Download the Mac OS installer (
FlowTraq-QX_XX-server-mac.sh.gz, whereQX_XXrepresents the current version of FlowTraq).Unzip the installer:
$ gunzip FlowTraq-QX_XX-server-mac.sh.gz
This produces
FlowTraq-QX_XX-server-mac.sh.Run the installer with superuser privileges, either by running as root or via
sudo:$ sudo sh FlowTraq-QX_XX-server-mac.sh
Press
[SPACE]to page through the license agreement, and typeYESwhen prompted to indicate your acceptance.
Like the upgrade processes for other systems, the upgrade is performed by downloading and running the install binaries. FlowTraq will detect the existing install and perform the necessary upgrade tasks, preserving the current configuration. To upgrade FlowTraq Server, take the following steps.
Download the universal Unix installer (
FlowTraq-QX_XX-server-unix.sh.gz, whereQX_XXrepresents the current version of FlowTraq).Unzip the installer:
$ gunzip FlowTraq-QX_XX-server-unix.sh.gz
This produces
FlowTraq-QX_XX-server-unix.sh.Run the installer with superuser privileges, either by running as root or via
sudo:$ sudo sh FlowTraq-QX_XX-server-unix.sh
Press
[SPACE]to page through the license agreement, and typeYESwhen prompted to indicate your acceptance.
Optional: Once the FlowTraq server is upgraded, the legacy standalone NBI service can be upgraded if desired. It is not necessary for most installations, which will rely on the built-in alerting functionality. At most one copy of FlowTraq NBI is needed per cluster, typically installed on the Portal node. The FlowTraq NBI service is upgraded in a similar way as the FlowTraq server.
Download the universal Unix installer (
FlowTraq-QX_XX-nbi-unix.sh.gz, whereQX_XXrepresents the current version of FlowTraq).Unzip the installer:
$ gunzip FlowTraq-QX_XX-nbi-unix.sh.gz
This produces
FlowTraq-QX_XX-nbi-unix.sh.Run the installer with superuser privileges, either by running as root or via
sudo:$ sudo sh FlowTraq-QX_XX-nbi-unix.sh
Press
[SPACE]to page through the license agreement, and typeYESwhen prompted to indicate your acceptance.
Finally, the FlowTraq Web UI is updated. This process is simple:
Download the FlowTraq Web tarfile (
FlowTraq-QX_XX-web.tar.gz, whereQX_XXrepresents the current version of FlowTraq).Copy the .tgz file to webhome (typically
/var/wwwor/var/html).Unzip the file in place, overwriting the
flowtraqdirectory:$ sudo tar -xzf FlowTraq-QX_XX-web.tar.gz
![[Caution]](../common/images/admon/caution.png) | Caution |
|---|---|
If any custom changes have been made to any of the files, they will be overwritten. It is generally not safe to simply back up and restore saved files, as changes to the UI may have introduced complications. |
