
This section outlines the process of manually installing or updating the FlowTraq web portal and NBI components. It is highly recommended that you use the FlowTraq vApp to provision the web portal.
![[Tip]](../common/images/admon/tip.png) | Tip |
|---|---|
The FlowTraq vApp includes an optimized installation of the FlowTraq HTML5 web portal, including all NBI components. It also has a mechanism for quickly and safely upgrading when new releases are avialable. |
We recommend installing FlowTraq Web and FlowTraq NBI Server on a Linux/Apache2/PHP5 stack; however, many other platforms will work.
![[Note]](../common/images/admon/note.png) | Note |
|---|---|
Note: While FlowTraq Web Portal can connect to remote instances of FlowTraq Server, the FlowTraq Command Line Tools (which are included with FlowTraq Server) must be installed locally for FlowTraq Web Portal to function. |
FlowTraq NBI Server requires a PostgreSQL Server, installed either locally or remotely. In addition, the following standard packages must be installed locally on the host:
PHP5 interpreter and command line tools with support for Process Control (pcntl), POSIX, and PostgreSQL (pgsql)
Web server (e.g. apache2) with PHP5 support (e.g. mod_php)
![[Important]](../common/images/admon/important.png)
Important We strongly recommend configuring your web server to only accept secure https connections or to automatically redirect http requests to https.
| Upcoming Changes |
|---|---|
Future versions of FlowTraq Web Portal may have additional dependencies. |
In general, installing FlowTraq Web and NBI tools is a 6-step process.
Install FlowTraq Server.
Install FlowTraq Web prerequisites (apache, php, etc.)
Install FlowTraq Web.
Install FlowTraq NBI prerequisites. (postgres, php-pg, etc)
Configure PostgreSQL server.
Install FlowTraq NBI.
We have provided detailed installation guides for several common platforms. We strongly recommend using one of these platforms:
OpenSuSE Linux 11 - Installation Guide
FlowTraq Server
Download and install FlowTraq Server by downloading the installer package, gunzipping it, and running it as root:
# wget http://www.flowtraq.com/downloads/flowtraq/flowtraq_VERSION/FlowTraq-VERSION-server-unix.sh.gz
# gunzip FlowTraq-VERSION-server-unix.sh.gz
# sh ./FlowTraq-VERSION-server-unix.sh
It will unpack the binaries and startup scripts relevant for your OS, and install (by default) in /opt/flowtraq. Command-line tools can be found in /opt/flowtraq/clitools, and the NBAD/NBI toolkit is in /opt/flowtraq/nbitools.
For more information on installing FlowTraq Server, please see the FlowTraq Server Installation.
Install a license key for FlowTraq Server. The quickest way is by appending it directly to the FlowTraq configuration file. Replace the placeholders below with your own license details:
# echo -ne "user YOURUSERNAME\nlicense FlowTraq_FULL-XXXX-XXXX-XXXX-XXXX-XXXX-XXXX\n\n" >> /opt/flowtraq/flowtraq.conf
# killall -HUP flowtraq
Note that you can also install the license key through the desktop GUI.
FlowTraq Web
Using YaST, install the required software prerequisites:
apache2
apache2-mod_php5
cphp5
Download the web GUI and unpack in your webroot:
# cd /srv/www/htdocs
# wget http://www.flowtraq.com/downloads/flowtraq/flowtraq_VERSION/FlowTraq-VERSION-web.tar.gz
# gunzip -c FlowTraq-VERSION-web.tar.gz | tar xvf -
# cp /srv/www/htdocs/flowtraq/config-sample.php /srv/www/htdocs/flowtraq/config.php
Note This will create a directory called
flowtraq. You will be able to access the FlowTraq web user interface by browsing to the/flowtraqdirectory on your webserver. We recommend installing in/srv/www/htdocs/flowtraq. If you install elsewhere, be sure to configure thebaseURLconfiguration option in config.php.Configure and launch apache. Apache needs the 'MultiViews' option to be enabled. Edit the /etc/apache2/default-server.conf and change the line that reads:
Options NoneTo:
Options Indexes MultiViewsfor the default
<Directory "/srv/www/htdocs">section.In Yast->System->Services, 'ENABLE' apache2, which will start the apache webserver.
Now point your browser at http://127.0.0.1/flowtraq to verify that your installation was successful. Log in with username
adminand passwordadminby default. If the Dashboard appears, but the graphs and tables do not load, then you license key may have expired. Contact FlowTraq to obtain a new license key.You will notice that the 'Threats' page remains empty. In order to use the NBI tools from the GUI you must now install the FlowTraq NBI server.
FlowTraq NBI Server
Using YaST, install the following additional prerequisites:
php5-pcntl
php5-posix
php5-pgsql
postgresql
postgresql-server
In Yast->System->Services, 'ENABLE' postgresql, which will launch the database process. Also, restart the apache2 service, which will enable the newly installed php plugins.
The PostgreSQL database must be configured to work with FlowTraq. The installer of the NBI server will ask for details on the database configuration. This configuration should be created in advance:
# su - postgres
# psql
psql> CREATE USER flowtraq WITH PASSWORD 'pleaseuseastrongpassword';
psql> CREATE DATABASE flowtraq;
psql> GRANT ALL PRIVILEGES ON DATABASE flowtraq TO flowtraq;
psql> \q
# createlang -d flowtraq plpgsql
Next, enable password login for PostgreSQL connections. This is done by modifying the
pg_hba.conffile. On SuSE this file is located at:/var/lib/pgsql/data/pg_hba.conf. Change the line that says:host all all 127.0.0.1/32 identTo:
host all all 127.0.0.1/32 md5Now restart the PostgreSQL server, either through Yast->System->Services or by invoking:
# service postgresql restartDownload and run the FlowTraq NBI installer package:
# wget http://www.flowtraq.com/downloads/flowtraq/flowtraq_VERSION/FlowTraq-VERSION-nbi_unix.sh.gz
# gunzip FlowTraq-VERSION-nbi_unix.sh.gz
# sh ./FlowTraq-VERSION-nbi_unix
The NBI installer will check to ensure that the proper prerequisites have been installed (PHP, PostgreSQL, etc).
After this, it will ask a series of questions, including the install location of the PostgreSQL database (default: 127.0.0.1), the username (default: flowtraq), and the database name (default: flowtraq). You will have to give the password for this user also.
Finally, the NBI installer will ask you for your FlowTraq server install location, which, by default is 127.0.0.1, port 9640. You will be asked to enter administrator credentials, such that the NBI installer can create a special flowtraq user that will invoke the detectors. Use a strong password for this special user.
You will need to provide the PostgreSQL connection information to FlowTraq Web. Open 'config-sample.php' in the
/srv/www/htdocs/flowtraqdirectory for editing, and find the NBISERVER variable. Modify the placeholders in this variable to provide the username (flowtraq) and password (which you provided above) to the PostgreSQL database. Finally, save the modified configuration as/srv/www/htdocs/flowtraq/config.phpReturn to http://127.0.0.1/flowtraq and visit the 'Threats' page to verify that you can now create detectors.
This concludes the installation of FlowTraq Web and FlowTraq NBI Server.
FlowTraq Server
Download and install FlowTraq Server by downloading the installer package, gunzipping it, and running it as root:
# wget http://www.flowtraq.com/downloads/flowtraq/flowtraq_VERSION/FlowTraq-VERSION-server-unix.sh.gz
# gunzip FlowTraq-VERSION-server-unix.sh.gz
# sh ./FlowTraq-VERSION-server-unix.sh
It will unpack the binaries and startup scripts relevant for your OS, and install (by default) in /opt/flowtraq. Command-line tools can be found in /opt/flowtraq/clitools, and the NBAD/NBI toolkit is in /opt/flowtraq/nbitools.
For more information on installing FlowTraq Server, please see the FlowTraq Server Installation.
Install a license key for FlowTraq Server. The quickest way is by appending it directly to the FlowTraq configuration file. Replace the placeholders below with your own license details:
# echo -ne "user YOURUSERNAME\nlicense FlowTraq_FULL-XXXX-XXXX-XXXX-XXXX-XXXX-XXXX\n\n" >> /opt/flowtraq/flowtraq.conf
# killall -HUP flowtraq
Note that you can also install the license key through the desktop GUI.
Modify your firewall settings to allow incoming NetFlow, sFlow, etc:
# ufw allow 2055
FlowTraq Web
Install the required software prerequisites:
# apt-get install apache2 php5 libapache2-mod-php5 php5-cliDownload the web GUI and unpack in your webroot:
# cd /var/www
# wget http://www.flowtraq.com/downloads/flowtraq/flowtraq_VERSION/FlowTraq-VERSION-web.tar.gz
# gunzip -c FlowTraq-VERSION-web.tar.gz | tar xvf -
# cp /var/www/flowtraq/config-sample.php /var/www/flowtraq/config.php
Note This will create a directory called
flowtraq. You will be able to access the FlowTraq web user interface by browsing to the/flowtraqdirectory on your webserver. We recommend installing in/var/www. If you install elsewhere, be sure to configure thebaseURLconfiguration option in config.php.Configure and launch apache. Apache needs the 'MultiViews' option to be enabled. Edit the
/etc/apache2/sites-available/defaultfile and, if needed change the block that reads:Options ... </Directory>To:
Options ... MultiViews
</Directory>
in the
<Directory "/var/www">section.Note Debian users making use of this guide will need to take the additional step of enabling the .php mimetype. This is most easily done via an addition to the Directory listing above:
AddType application/x-httpd-php .phpin the
<Directory "/var/www">section.Restart apache2, which will start the apache webserver and enable your changes:
# /etc/init.d/apache2 restartNow point your browser at http://127.0.0.1/flowtraq to verify that your installation was successful. Log in with username
adminand passwordadminby default. If the Dashboard appears, but the graphs and tables do not load, then you license key may have expired. Contact FlowTraq to obtain a new license key.You will notice that the 'Threats' page remains empty. In order to use the NBI tools from the GUI you must now install the FlowTraq NBI server.
FlowTraq NBI Server
Install the following additional prerequisites:
# apt-get install postgresql php5-pgsql postgresql-clientRelaunch apache2, which will start the apache webserver and enable your changes:
# /etc/init.d/apache2 restartThe PostgreSQL database must be configured to work with FlowTraq. The installer of the NBI server will ask for details on the database configuration. This configuration should be created in advance:
# su - postgres
# psql
psql> CREATE USER flowtraq WITH PASSWORD 'pleaseuseastrongpassword';
psql> CREATE DATABASE flowtraq;
psql> GRANT ALL PRIVILEGES ON DATABASE flowtraq TO flowtraq;
psql> \q
# createlang -d flowtraq plpgsql
Next, enable password login for PostgreSQL connections. This is done by modifying the
pg_hba.conffile. On Ubuntu this file is located at:/etc/postgresql/<version number>/main/pg_hba.conf. Edit the file and, if needed, change the line that says:host all all 127.0.0.1/32 identTo:
host all all 127.0.0.1/32 md5Now restart the PostgreSQL server:
# /etc/init.d/postgresql restartDownload and run the FlowTraq NBI installer package:
# wget http://www.flowtraq.com/downloads/flowtraq/flowtraq_VERSION/FlowTraq-VERSION-nbi_unix.sh.gz
# gunzip FlowTraq-VERSION-nbi_unix.sh.gz
# sh ./FlowTraq-VERSION-nbi_unix.sh
The NBI installer will check to ensure that the proper prerequisites have been installed (PHP, PostgreSQL, etc).
After this, it will ask a series of questions, including the install location of the PostgreSQL database (default: 127.0.0.1), the username (default: flowtraq), and the database name (default: flowtraq). You will have to give the password for this user also.
Finally, the NBI installer will ask you for your FlowTraq server install location, which, by default is 127.0.0.1, port 9640. You will be asked to enter administrator credentials, such that the NBI installer can create a special flowtraq user that will invoke the detectors. Use a strong password for this special user.
You will need to provide the PostgreSQL connection information to FlowTraq Web. Open 'config-sample.php' in the
/var/www/flowtraqdirectory for editing, and find the NBISERVER variable. Modify the placeholders in this variable to provide the username (flowtraq) and password (which you provided above) to the PostgreSQL database. Finally, save the modified configuration as/var/www/flowtraq/config.phpReturn to http://127.0.0.1/flowtraq and visit the 'Threats' page to verify that you can now create detectors.
This concludes the installation of FlowTraq Web and FlowTraq NBI Server.
FlowTraq Server
Download and install FlowTraq Server by downloading the installer package, gunzipping it, and running it as root:
# yum install wget
# wget http://www.flowtraq.com/downloads/flowtraq/flowtraq_VERSION/FlowTraq-VERSION-server-unix.sh.gz
# gunzip FlowTraq-VERSION-server-unix.sh.gz
# sh ./FlowTraq-VERSION-server-unix.sh.gz
It will unpack the binaries and startup scripts relevant for your OS, and install (by default) in /opt/flowtraq. Command-line tools can be found in /opt/flowtraq/clitools, and the NBAD/NBI toolkit is in /opt/flowtraq/nbitools.
For more information on installing FlowTraq Server, please see the FlowTraq Server Installation.
Install a license key for FlowTraq Server. The quickest way is by appending it directly to the FlowTraq configuration file. Replace the placeholders below with your own license details:
# echo -ne "user YOURUSERNAME\nlicense FlowTraq_FULL-XXXX-XXXX-XXXX-XXXX-XXXX-XXXX\n\n" >> /opt/flowtraq/flowtraq.conf
# /etc/init.d/flowtraq restart
Note that you can also install the license key through the desktop GUI.
FlowTraq Web
Install the required software prerequisites:
# yum install httpd mod_ssl php php-processDownload the web GUI and unpack in your webroot:
# cd /var/www/html/html
# wget http://www.flowtraq.com/downloads/flowtraq/flowtraq_VERSION/FlowTraq-VERSION-web.tar.gz
# gunzip -c FlowTraq-VERSION-web.tar.gz | tar xvf -
# cp /var/www/html/flowtraq/config-sample.php /var/www/html/flowtraq/config.php
Note This will create a directory called
flowtraq. You will be able to access the FlowTraq web user interface by browsing to the/flowtraqdirectory on your webserver. We recommend installing in/var/www/html. If you install elsewhere, be sure to configure thebaseURLconfiguration option in config.php.Configure and launch apache. Apache needs the 'MultiViews' option to be enabled. Edit the
/etc/httpd/conf/httpd.conffile and, if needed change the line that reads:Options Indexes FollowSymLinksTo:
Options Indexes FollowSymLinks MultiViewsin the
<Directory "/var/www/html">section.Start the apache webserver, and set it to start by default:
# service httpd start
# /sbin/chkconfig httpd on
Turn off SELinux. CentOS 5 turns on SELinux by default, which prevents Apache from running outside tools via CGI, including the FlowTraq command line tools. Because /opt/flowtraq is outside the httpd_t domain, httpd cannot access it. More information can be found at http://wiki.centos.org/HowTos/SELinux
The simplest way to deal with this is to put SELinux into permissive mode. To do so, edit
/etc/selinux/configand changeSELINUX=enforcingTo:
SELINUX=permissiveThen run:
# setenforce permissiveIf you cannot put SELinux into permissive mode, please see the following knowledge base for a workaround which involves making FlowTraq part of the httpd security domain: Knowledge Base Article.
Now point your browser at http://127.0.0.1/flowtraq to verify that your installation was successful. Log in with username
adminand passwordadminby default. If the Dashboard appears, but the graphs and tables do not load, then you license key may have expired. Contact FlowTraq to obtain a new license key.You will notice that the 'Threats' page remains empty. In order to use the NBI tools from the GUI you must now install the FlowTraq NBI server.
FlowTraq NBI Server
Install the following additional prerequisites:
# yum install postgresql postgresql-server php-pgsqlInitialize and start postgresql:
# service postgresql initdb
# service postgresql start
Set postgres to be started on reboot:
# /sbin/chkconfig postgresql onAlso, restart the apache2 service, to enable the newly installed php plugins.
# service httpd startThe PostgreSQL database must be configured to work with FlowTraq. The installer of the NBI server will ask for details on the database configuration. This configuration should be created in advance:
# su - postgres
# psql
psql> CREATE USER flowtraq WITH PASSWORD 'pleaseuseastrongpassword';
psql> CREATE DATABASE flowtraq;
psql> GRANT ALL PRIVILEGES ON DATABASE flowtraq TO flowtraq;
psql> \q
# createlang -d flowtraq plpgsql
Next, enable password login for PostgreSQL connections. This is done by modifying the
pg_hba.conffile. On CentOS this file is located at:/var/lib/pgsql/data/pg_hba.conf. Edit the file and, if needed, change the line that says:host all all 127.0.0.1/32 identTo:
host all all 127.0.0.1/32 md5Now restart the PostgreSQL server:
# service postgresql restartDownload and run the FlowTraq NBI installer package:
# wget http://www.flowtraq.com/downloads/flowtraq/flowtraq_VERSION/FlowTraq-VERSION-nbi_unix.sh.gz
# gunzip FlowTraq-VERSION-nbi_unix.sh.gz
# sh ./FlowTraq-VERSION-nbi_unix.sh
The NBI installer will check to ensure that the proper prerequisites have been installed (PHP, PostgreSQL, etc).
After this, it will ask a series of questions, including the install location of the PostgreSQL database (default: 127.0.0.1), the username (default: flowtraq), and the database name (default: flowtraq). You will have to give the password for this user also.
Finally, the NBI installer will ask you for your FlowTraq server install location, which, by default is 127.0.0.1, port 9640. You will be asked to enter administrator credentials, such that the NBI installer can create a special flowtraq user that will invoke the detectors. Use a strong password for this special user.
You will need to provide the PostgreSQL connection information to FlowTraq Web. Open 'config-sample.php' in the
/var/www/html/flowtraqdirectory for editing, and find the NBISERVER variable. Modify the placeholders in this variable to provide the username (flowtraq) and password (which you provided above) to the PostgreSQL database. Finally, save the modified configuration as/var/www/html/flowtraq/config.phpReturn to http://127.0.0.1/flowtraq and visit the 'Threats' page to verify that you can now create detectors.
This concludes the installation of FlowTraq Web and FlowTraq NBI Server.
The FlowTraq Web Interface was designed to run on Unix platforms running Apache 2.2 and up and PHP 5.3 and up. Starting with FreeBSD 9.0 these packages are included the default download repository. FreeBSD versions 8.0 through 8.3 do not contain sufficiently modern versions of these packages in pre-built form. The instructions below demonstrate the installation of the FlowTraq Web Interface on a FreeBSD 8.2 system using the portsnap utility to download and install the prerequisite source packages for Apache and PHP.
To avoid conflicts in running packages, it is recommended this installation is only performed on a pristine FreeBSD system. Configure the portsnap utility with the latest port source tree and extract the sources
freebsd# portsnap fetch
freebsd# portsnap extract
Configure, compile and install Apache 2.2:
freebsd# cd /usr/ports/www/apache22
freebsd# make install && make clean
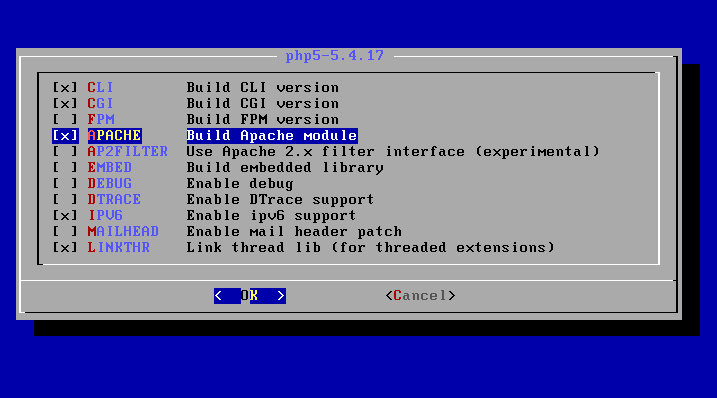
Configure, compile and install PHP 5.3. In the configuration menu, make sure to select the APACHE extension:
freebsd# cd /usr/ports/lang/php5
freebsd# make install && make clean
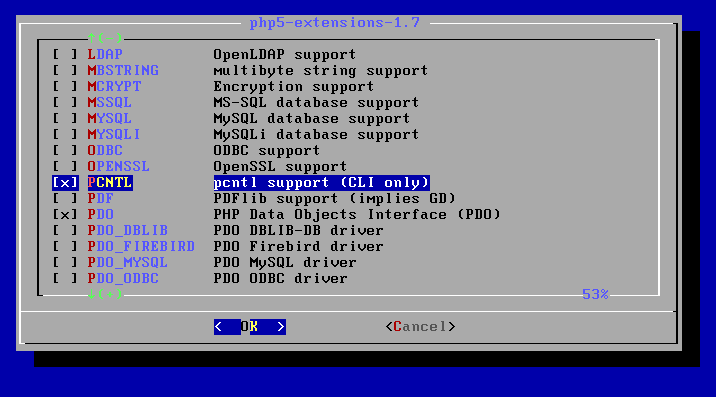
Finally, a number of PHP extensions must also be compiled and installed. Specificially, make sure all of PCNTL, PDO_PGSQL, POSIX, PGSQL, SOCKETS, BZ2, ZLIB, CALENDAR, SESSION are selected:
freebsd# cd /usr/ports/lang/php5-extensions
freebsd# make install && make clean
The last step in the installation process is configuring the packages for use. In many cases the defaults are sufficient:
cd /usr/local/etc/
cp php.ini-production php.ini
Next are some modifications to the /usr/local/etc/apache22/httpd.conf configuration file. Specifically:
Add the x-httpd-php application type in the mime_module section:
<IfModule mime_module>
    #  Default types:
    TypesConfig etc/apache22/mime.types
    AddType application/x-compress .Z
    AddType application/x-gzip .gz .tgz

   	#  Add the PHP type here:
    AddType application/x-httpd-php .php
</IfModule>
Allow index.php as a directory index:
<IfModule dir_module>
    DirectoryIndex index.php index.html
</IfModule>
Enable MultiViews:
<Directory "/usr/local/www/apache22/data">
    #  Simply add MultiViews to the end:
    Options Indexes FollowSymLinks MultiViews

	#
    AllowOverride None
    Order allow,deny
    Allow from all
</Directory>
Next enable Apache to start automatically by modifying /etc/rc.conf:
apache22_enable="YES"
Start Apache:
freebsd# /usr/local/etc/rc.d/apache22 start
Installing FlowTraq and FlowTraq Web is similar on all Unix-style platforms. The FlowTraq server is a delivered as a self-installing executable that must be run by the superuser. The Web Interface is a collection of files that must be unpacked in your webroot data directory. Download the most recent version of FlowTraq server first:
For more information on installing FlowTraq Server, please see the FlowTraq Server Installation.
freebsd# cd
freebsd# /usr/local/bin/wget http://www.flowtraq.com/downloads/flowtraq/flowtraq_VERSION/FlowTraq-VERSION-server-unix.sh.gz
freebsd# gunzip FlowTraq-VERSION-server-unix.sh.gz
freebsd# sh ./FlowTraq-VERSION-server-unix.sh
Accept the EULA and follow the installation instructions. By default FlowTraq installs in /opt/flowtraq/ and will be enabled in your /etc/rc.conf. Download and install the Web Interface in your data directory of your webroot, by default /usr/local/www/apache22/data/, and creating the configuration file. In most cases the default config.php will be fine:
freebsd# cd
freebsd# /usr/local/bin/wget http://www.flowtraq.com/downloads/flowtraq/flowtraq_VERSION/FlowTraq-VERSION-web.tar.gz
freebsd# cd /usr/local/www/apache22/data/
freebsd# gunzip -c ~/FlowTraq-VERSION-web.tar.gz | tar xvf -
freebsd# cd flowtraq
freebsd# mv config-sample.php config.php
At this point you can browse to your FreeBSD 8.2 system and use the FlowTraq Web Interace on http://freebsd/flowtraq.
After installation, you may access FlowTraq Web by pointing a web browser to http://127.0.0.1/flowtraq (or similar, depending on the address / hostname and location you installed FlowTraq Web).
| Note |
|---|---|
The default username and password for the initial user is admin/admin. |
The variable NBISERVER was not defined in config.php, or config.php was not found.
NBISERVER specifies the database connection string used to connect to the NBI PostgreSQL database. Edit /path/to/webroot/config.php (if this file does not exist, please create it using /path/to/webroot/config-sample.php as a template). Set NBISERVER to a valid PostgreSQL connection string corresponding to the PostgreSQL database you previously set up for FlowTraq NBI. For more information on PostgreSQL connection strings, see pg_connect().
The connection string specified in config.php's NBISERVER was not defined in config.php.
Ensure that PostgreSQL is installed, that password identification is enabled (pg_hba.conf). Then make sure the host, database, username, and password specified in the NBISERVER variable in config.php are valid. For more information, please see Section 2.4, “Installing the Web Portal”.
The version of FlowTraq Server is too old to support the identification and authentication methods required by FlowTraq NBI Server. Please upgrade FlowTraq Server to version Q1/13 or greater.
To reauthenticate the NBI Server to FlowTraq Server, uninstall FlowTraq NBI and reinstall. During installation, be sure to provide the the installer with the credentials of a valid admin user.
# /opt/flowtraq-nbi/uninstall.sh
# rm -rf /opt/flowtraq-nbi
# wget http://www.flowtraq.com/downloads/flowtraq/flowtraq_VERSION/FlowTraq-VERSION-nbi_unix.sh.gz
# gunzip FlowTraq-VERSION-nbi_unix.sh.gz
# sh ./FlowTraq-VERSION-nbi_unix.sh
